Showing posts with label DIY. Show all posts

Saturday, December 21, 2013

Awkward Closet Redo--Dollar Store Solutions

I have this awkward closet/wall/door thing in the room I've converted into my actual closet.
My house is a million years old, and way back in the day, closets weren't really a big priority.
In fact, bathrooms weren't a priority. It's super obvious where someone in the past just tacked on my bathroom to the exterior of the house.
I have this horrible image of me absentmindedly walking through my backyard and accidentally falling into a pit of what used to be the outhouse.

I'm shuttering just thinking about it.
Ok, back on track.
So, in addition to adding a bathroom to the house, someone at some point decided to add a closest.
But instead of what you or I might think of as a closet, someone just built out a wall paralled to the existing one and called it good.


This little area has been the scourge of my existence.
That curtain there? It's really just to keep my from having to see the mess that was that hole and go into immediate organizing guilt.
But one of my favorite bloggers,I Heart Organizing, recently tackled an awkward storage space in her house, and she inspired me to do the same.
To see her final (amazing) product, see this post.
Like her storage area, mine started out as something that just held little-used items...then, as time went on, more....and more... and more things just appeared there.
It got to a point where I really couldn't even get to anything, because it was so precariously piled that one risked injury even getting too close.
I didn't think about taking a "before" picture, and honestly I'm ok with it. It was too ugly to subject you too, dear readers.
A fairly accurate representation of what the closet looked like before.
The first step was taking everything out.

it also snakes around to the left
I know that this seems like a lot of work, and maybe you even think it's not worth it.
TRUST ME. It is totally worth it
Starting with a blank slate saves so much time, frustration and wasted energy.
Step number two was to install a light.
A big part of my problem was that I couldn't see anything pushed back into that far-away corner.
I got this battery-operated light at Amazon for practically nothing.
Then came a trip to the dollar store!!!!
I love an excuse to visit the dollar store. But let's be honest--I don't even need an excuse.
A shopping spree at a dollar store is practically nothing anyway!
I grabbed everything I could find that even remotely looked organizational-y.
And spent a grand total of $15 and some change.
Then I organized all the things I wanted to keep into piles. Everything else I didn't need or didn't want went into the trash or the donation pile.
From there I took washi tape and labeled all the bins.
Initially I didn't think I would need labels, because I bought all sorts of different kinds of bins.
But it's amazing how just a week later one forgets where she put anything.
Those labels have been a blessing.
This ugly, under-used space now holds my beauty items that I buy on sale or in bulk. I also have a whole bin for all the samples that come along with a serious Ulta and Sephora addiction.
I couldn't be happier about this project. I now see what I have when it comes to beauty products, which has kept me from buying shampoo on every grocery trip--because I'm just sure I'm out--and having six bottles around the house.
I also had no idea how many nail polish colors I already had until I put them all in one place. That's saved a lot of random nail polish buys. I have 14 different reds. Come on.
Now I'm already looking for my next project!
What organization projects have you done recently? Let me know, I'd love to see your ideas!

Tuesday, December 3, 2013

GLITTER!!

Everyone has their weaknesses. 
One of mine happens to be glitter.
What is it about glitter?
Everything is better with glitter. 
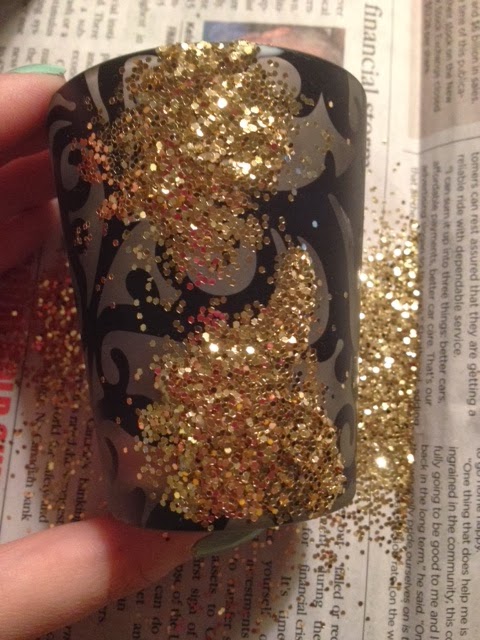
For example: these votives. 


 They were perfectly fine before. 
But fine just really wasn't what I was going for. I'm on a recent mission to rid my life of clutter (since I'll be moving soon, for one), I've been paring down the tchotchkes in my home. 
This has been my recent motto:


But then I got a tube of glitter.
 And once you open a tube of glitter, you can't just do one project. The first was just to write our names on the cheap-o stockings I got (I will be festive this holiday season! I will!!)
After that I had an almost full tube of glitter. 
Can't let it go to waste!
So I got to gluing. At first, I tried superglue. Bad idea. Stick with the good-old Elmer's. 
Second, I tried to follow the existing design on the votive. That also did not work, because Elmer's just doesn't stay thin and tacky enough to maintain the shape. 
Blobby is not a good look
So then I just went wild and covered the whole thing in glue, going small section by section. I just used the cap on the glue bottle to spread an even, pretty think layer of glue from top to bottom in 1-inch sections. Between each section I let it dry for a minute or two just so it wouldn't move when I turned the votive. 
*Note* I did not roll the votive in the glitter, I sprinkled it on. Rolling is a lot messier. Trust me.
And look at the result! 

This is now the scene of my bedside storage bin-turned bedside table (which I hope to replace with some real furniture someday soon. 


What about that awesome gold skull, you ask? It was a plastic skull from the Dollar Store's Halloween decorations that I spray painted gold. The tray? Another dollar store find.

And you know what the best part is? I still have lots of glitter left :)

<3 CopyKat

Monday, November 18, 2013

The Fall Shop Your Closet Challenge: Fix it!

Alright, bloggies, how is your go at the Fall Shop Your Closet Challenge going?
Do you hate it yet?
It's ok to hate it at first, really. 
I'm waaaay overdue to pass on some tips on what I plan on doing to keep up with the challenge.
The first--fix it, don't trash it. 
I have the most wonderful pair of brown boots. I get complements on them ALL.THE. TIME. 
Which is probably why these poor guys have a big 'ole hole in them now. Because I wear them constantly. 
Sad boot

In years past, I would have tossed these babies and spent countless hours and probably a stupid amount of money replacing them. 
See how cute this boot is? Please ignore the fact that it is surrounded by cat hair.
But not this time. Instead, I decided to try my hand at fixing them myself. 

How in the world did you plan that, you ask?

Enter sugru. 
I have no idea what the correct pronunciation is. 

This really isn't a product placement, I swear. (Even though the logo seems to have found its way into multiple photos.) Sugru doesn't even know who I am. 

But this stuff is great and you should totally get some. 

It's an air-drying rubber that forms to whatever you add it to. In my case, le boot. 


I decided that just fixing the toe of the boot would look odd, so I took a thin bead of sugru around the whole edge. Think of those little Play-Dough snakes you used to roll out as a kid. Same process. 
Then just make sure you smush and smooth it into place. 
A little goes a long way. I used one "mini pack" for each boot.
And voila! Practically all new, waterproof boots. 
So what are some ways you've found to extend the life of your favorite clothing items? Tell me about them in the comments!

Wednesday, October 30, 2013

DIY: Adorable Pom-Pom Pillow

There's just something about pom-poms. Or pom-pons, whichever you prefer. 
Either way, they add instant personality. 
And for a long time now, my bed has needed personality. 
Then in walks into my life a beautiful bag on pom-poms at Dollar Tree. 
All this amazingness.. just a buck a piece
My prayers had been answered. 
I still have a lot of plans for this room, but these adorable pillows have really gotten the ball rolling. 
Let me show you how I did it. 
I got pillow forms awhile back from Joann. 
But if I hadn't had them, I've made a habit of going to a local resale store and buying up cheap ones, even if they're ugly. (Just not smelly. Smelly does not work). 
Then I took some cheap, white pillowcases and turned them inside out. 
Inside out, you say? 
Yes. I'm not crazy. Well, not for this reason. 
I turned the pillowcase inside out, and sewed the other two hems in a similar way to give me a shelf around the whole pillow. 

I used option #11. Gave me a good solid foundation
And Oliver supervised

And here's what they looked like after the sewin'
That made it INFINITELY easier to sew on my little pom-poms. 
I hand-sewed them on. I'm sure there's some way to do this on a machine, but it would probably have taken me longer to figure out anyway. 
Needle sans-pom-pom

Needle with pom-pom
I decided to go for randomness, just keeping any colors from touching directly.  
Doesn't this look like a little caterpillar!?
Just keep sewing... just keep sewing... 
And the final product! 

What do you think? 


 Lucy, of course, approves. 


Thursday, September 12, 2013

ORGANIZE ALL THE THINGS: Part 2- Necklace Art Wall

Continuing on my organization kick, I decided this week to tackle my jewelry situation.
I have a ridiculous number of necklaces. I've tried over and over again to purge my collection, but they're all so pretty!
That's part of what lead me to my organizing solution.
Why hide them away? They really are art pieces, why not treat them that way?
That feeling lead me to this.


I've had these narrow blank walls that have just never looked right. But now they're art galleries! (please ignore the messy desk... clearly that is in need of organizing as well)


 I have thin plaster walls, which made thin nails unmanageable. So instead I went with thumbtacks. 

 This is easily my favorite organization solution thus far. In addition to being an art piece, I wear a better variety of jewelry now that I can see them all. It's like I've discovered a whole new wardrobe. 

Stayed tuned for some more organizing solutions! And I'm still looking for suggestions--have a great solution people should know about? Let me know in the comments!

<3 CopyKat

Thursday, August 29, 2013

Make it gold

My mom gave me a fantastic three-foot pedestal when I first moved to the house. 

But it's just never worked. 

It's been in just about every corner of the house. 

But it just never fit. 

You know what I mean?

I think part of it was the color. I didn't remember to take a photo before (sorry!) but it was a really great green color. 

That great color just never worked in my house. 

So I painted it gold. 
Of course the cat makes a cameo.

Doesn't it look great? 

But then a new problem arose: 
Now one solution would have just been to drill a hole in the bottom of a flower pot to navigate that weird spike thing. 

But there are two issues with this. 

For one, I'm really bad at overwatering plants. So drilling a hole in the bottom of a pot would have opened a pathway for water to run down and ruin that beautiful gold. 

And secondly, I had no intention of ruining the vase I wanted to use with the pedestal by drilling a hole in it. 

So instead I got a little creative. 

I took an old cookie tin and covered with that same gold spray paint. 


Then I punched a hole in the bottom using a hammer and a screwdriver. 

 And viola! 
 I think Sticky approves. 

Thursday, August 15, 2013

ORGANIZE ALL THE THINGS

I don't know what it is, but I'm on a major organization kick lately.


I started--where else?-- in my closet/makeup area.

I live in a very old house, so it didn't have a closet per se. Which meant I got to convert a whole room into a closet!

Yeah, I know. Dream come true.

Finally, after living here for a little more than year, I think I've come up with a system that works for me.

I'm in no way a morning person, so the easier, the better.


This is my cobbled-together vanity. I took a regular desk (actually a family heirloom) and just put a BIG mirror on top.

After months of looking for a "real" vanity, I finally gave up. I never found anything big enough or even close to my price range. ($200? Yeah right).

I like the desk setup because all the drawers make it easy to see ALL of my makeup and keep some things out of sight.


On top, I have my vanity mirror. (Which I highly recommend. Good lighting is soo important).

For a long time I had a case for all my makeup brushes, but inevitably they'd all end up strewn all over the place.

With a thrift-store vase:


And some floral beads:


I made an easy brush holder that keeps all of my brushes in sight in a put-together way.


And where did you get that beautiful Lucite tray, you ask?


You'll never guess.

...

It's actually just a cheapo clear box frame. $3 booyah.


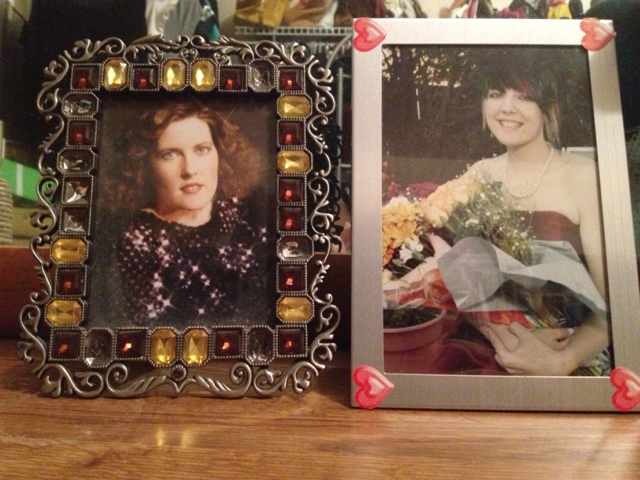
And most importantly, two of the pretties ladies I know. My mom and sister. 


So this is just the beginning of my organization makeover. What clever tricks do you have up your sleeve?